Google is the largest search engine in the world, getting the majority of the web search traffic. It goes without saying that website owners need to monitor their Google performance to ensure they’re not missing out on potential traffic.
Google Search Console (GSC) is the heart of Google’s interaction with website owners.
It allows users to monitor, maintain and troubleshoot their website’s presence on the web. But this is only possible if you know how to use this data goldmine properly.
Let’s learn the basics of Google Search Console so that you can make the most out of it for your website.
What is Google Search Console?
Google Search Console is a free service provided by Google that helps website owners track their website’s SEO health and search performance.
The dashboard provides an overview of many metrics, including but not limited to user experience, search appearance, technical SEO, and more.
Besides monitoring your site, you can also use GSC to submit individual URLs or sitemaps that you want Google to crawl. Plus, it shows you which pages can be crawled and indexed by Google.
How to Set Up Google Search Console
The prerequisite for using Google Search Console is to have a Google account and a website. If you have both these things, follow these steps to set up your GSC dashboard.
Sign In to GSC
Go to the GSC website and sign in to your account. You have two options: add a URL prefix or add a domain.
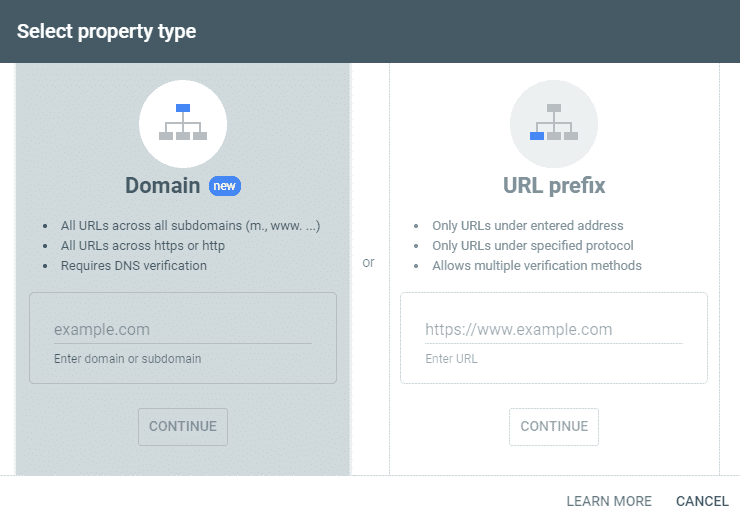


If you choose to add a domain property, you’ll get the most comprehensive data. The dashboard will show you information from all domain URLs, including subdomains, paths, and protocols.
To add your website this way, you’ll have to verify it via your domain name system provider (DNS). In the domain field, enter your domain name without ”www” and ”HTTP/HTTPS.”
For example, if your website is www.example.com, enter only example.com in the domain field. Click ”continue” and follow the verification process steps.
Google has a helpful video that will take you through these steps.
Alternatively, you can sign in by adding a URL prefix. Use this option if you only want to view data for a specific section on your website, such as the blog.
In this case, you enter your whole URL, including the ”www” and ”HTTP/HTTPS.”
For example, you would enter https://example.com/blog/ as the URL prefix. Again, Google will ask you to verify your URL prefix. There are five options:
- HTML file
- HTML tag
- Google Analytics
- Google Tag Manager
- Domain name provider
You can find detailed instructions on how to use each of these here.
Set Up Permissions
The next step is to set up permissions for your GSC account. You can either be a user or an owner.
Here’s how the permissions differ for each.
Owner
The owner is in full control of the account and can add or remove users, adjust settings, and view all data. They can also use all GSC tools.
Owners are of two types, although the permissions are the same for both of them.
- Verified Owner: The primary owner of the GSC account who has verified ownership through one of the five methods mentioned above. They can add or remove users and revoke access from others.
- Delegated Owner: A verified owner who has delegated their ownership to another person, usually an SEO specialist or agency. They cannot revoke access from the primary owner and can only remove their own permissions.
User
A GSC user has limited access to the account and can only view specific data based on their assigned permissions. They cannot add or remove users.
Users may be:
- Full Users: A full user can view all data, including settings and tools.
- Restricted Users: A restricted user can only view specific data.
- Associate: Although they can’t open or access the GSC account directly, an associate can perform certain tasks, depending on their association. For example, a GSC property may be associated with other entities like an Android app or a Google Analytics property.
According to Google, you can associate the following items with a GSC property:
- Google Analytics property
- Chrome Web Store account
- Android Play Store app
- Google Merchant Center account
- Play Console Developer account
- Google Ads account
- Google Assistant Actions Console project
Submit a Sitemap
If your website is well-organized, you don’t need to submit a sitemap. Google’s web crawlers can easily access all the pages. However, in the following situations, submitting a sitemap may be the right thing to do.
- Your website is really big and has thousands of pages.
- There are isolated pages on your website that don’t have inbound links from other web pages on your website.
- Your website is new and doesn’t have many backlinks.
- You use rich media content on your website that appears in Google News. The sitemap makes it easier for Google to crawl and index your content.
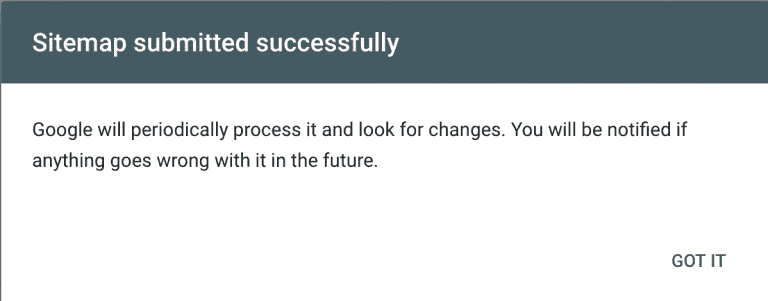
If you want to submit a sitemap, follow these steps:
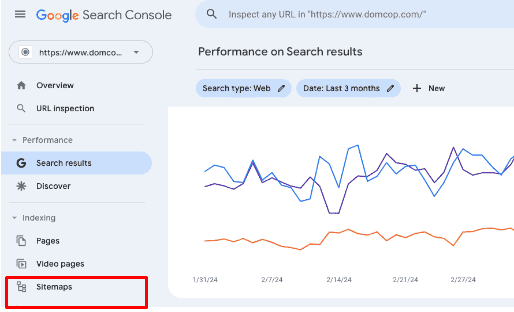
- In the GSC menu on the left-hand pane, click on ”Sitemaps.”
- Click ”Submit” under Add a new sitemap.
- Submit your sitemap.
- You’ll see the confirmation message that your sitemap has been submitted.
Source
What Data Does Google Search Console Show?
Now that your website is set up with GSC, you can take a look at the data it provides. Here are some of the things you’ll see when you log into your GSC account.
Overview Report
The Overview Report is the first one you’ll see when you log into GSC. It provides a high-level summary of your website’s performance, including:
- Site performance report: It shows the number of people who clicked on your website in Google SERPs.
- Coverage report: It informs you about the status of your indexed pages. You can also see any indexing errors that may be affecting your website’s visibility.
- Enhancement reports: The enhancements you’ve implemented on your website, such as structured data or rich cards, will be shown here.
- Manual actions report: Here, you’ll see any manual actions that have been taken against your website, such as a penalty for violating Google’s guidelines.
You can also see how these metrics have changed over time by selecting different date ranges.
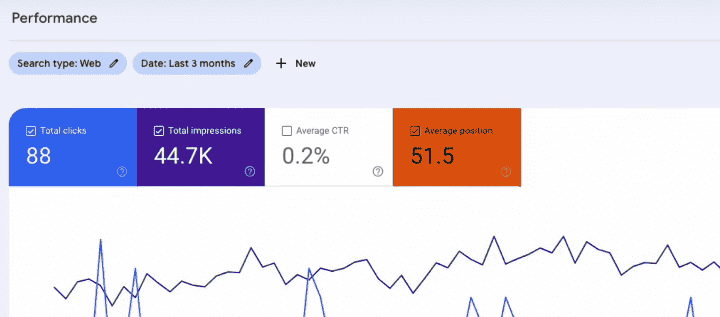
Performance Report
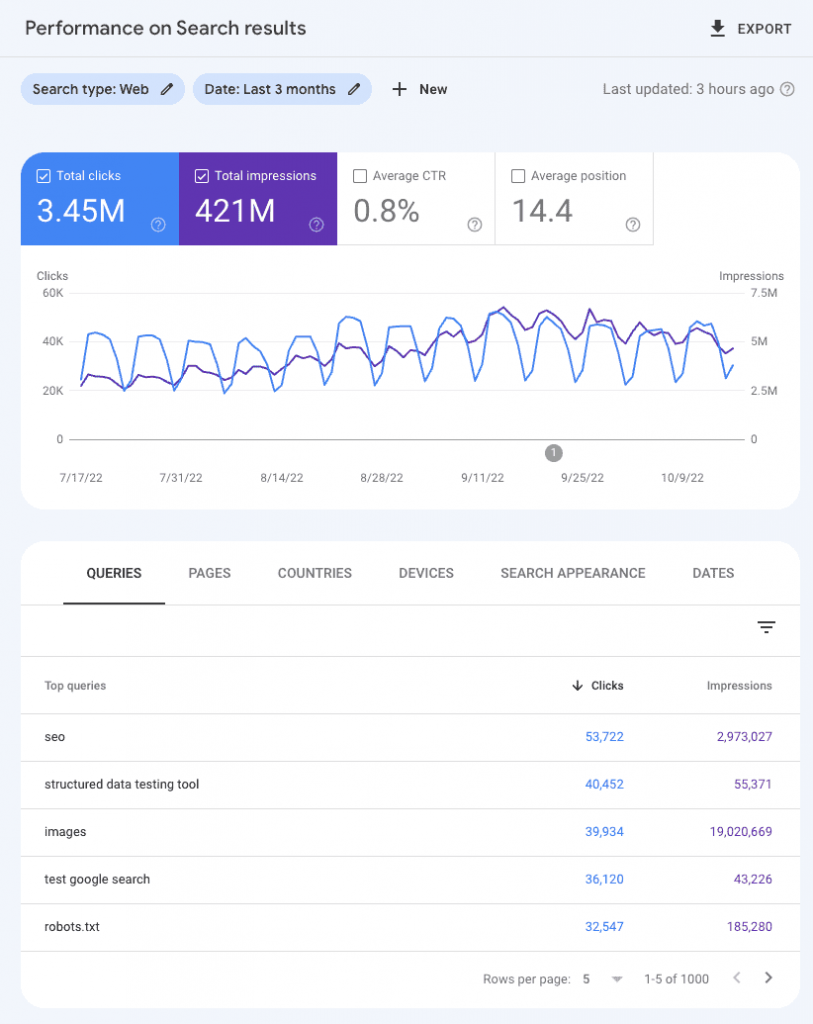
The Performance Report provides more detailed information about your website’s performance in Google SERPs.
Source
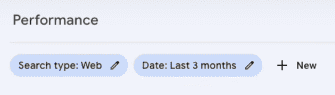
Before we go into it, let’s look at the adjustment options on top of the report:
- Date range: You can choose a specific time frame to view your website’s performance.
- Search type: The default is “Web,” but you can also view performance for image or video search results.
- Filters: You can add variables like query, page, country, device, and search appearance.
Above the table, you’ll see the following tabs:

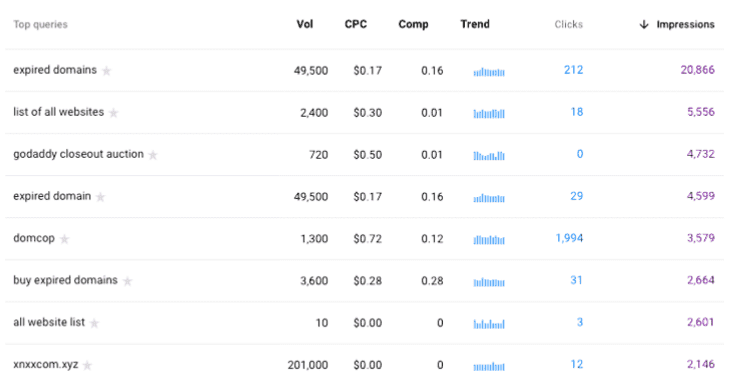
- Queries: These are the search terms that users use to type into Google and click on your website. You can see data like clicks, impressions, and position. Integrate Keywords Everywhere to see more information.
- Pages: These are the pages on your website that have been clicked in Google SERPs.
- Countries: The countries where your website appears in search results.
- Devices: The types of devices users are searching the web on when they click on your website.
- Search appearance: These are the different ways your website appears in search results, such as “featured snippets” or “rich results.”
- Dates: The time frame you selected for viewing your website’s performance.
You can filter the results by any of these categories by clicking on them.
Now, let’s go back to the top, where you see a graph. Above the graph is a visual representation of the average performance of your website in the past three months.
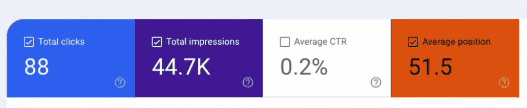
The graph shows total clicks, total impressions, average CTR, and average position over time.
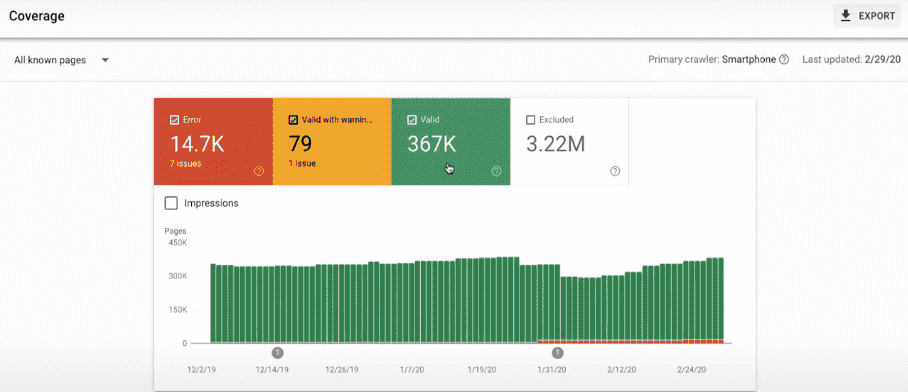
Coverage Report
The Coverage or Index Report shows how well your site is being indexed by Google. If the whole graph is green, you’re good to go.
Source
If there are any errors, they will be shown in the red box. You can then look at the issues and fix them to improve your site’s indexing.
Sitemap
A sitemap is a file that lists all the pages on your website in a structured format. We’ve already discussed how to add one to GSC.
Enhancements
The enhancement tab shows you three basic reports:
- Mobile usability report: It shows you how your website looks on mobile devices and if there are any errors or issues. Again, green means good, and red indicates issues that need to be resolved.
- Accelerated Mobile Pages report: Google took a step forward to improve the speed of mobile web pages by introducing Accelerated Mobile Pages (AMP). You can use a plugin to add AMP to your site. In this report, you’ll see if there are any errors or issues with your AMP pages.
- Structured data report: With structured data, you can show extra information in Google SERPs, such as star ratings or pictures. You can also identify errors in structure data with GSC. Use the Structured Data Testing Tool by Google to fix any issues.
Manual Actions
We hope you never have to see a report in this section. But if Google takes manual action on your site, you’ll see it here.
Manual actions are penalties that can result in a drop in rankings or even removal of your site from search results. Websites that do something super shady, such as using black hat SEO techniques or spamming, can face manual actions.
Links Report
The Links Report shows you the internal and external links on your site.
You’ll see how many pages link to a specific page on your website. It helps you find out which pages get the most backlinks.
First, GSC will show you how many backlinks your whole website has. Then, you can view the top pages with the most backlinks and see which sites link to them.
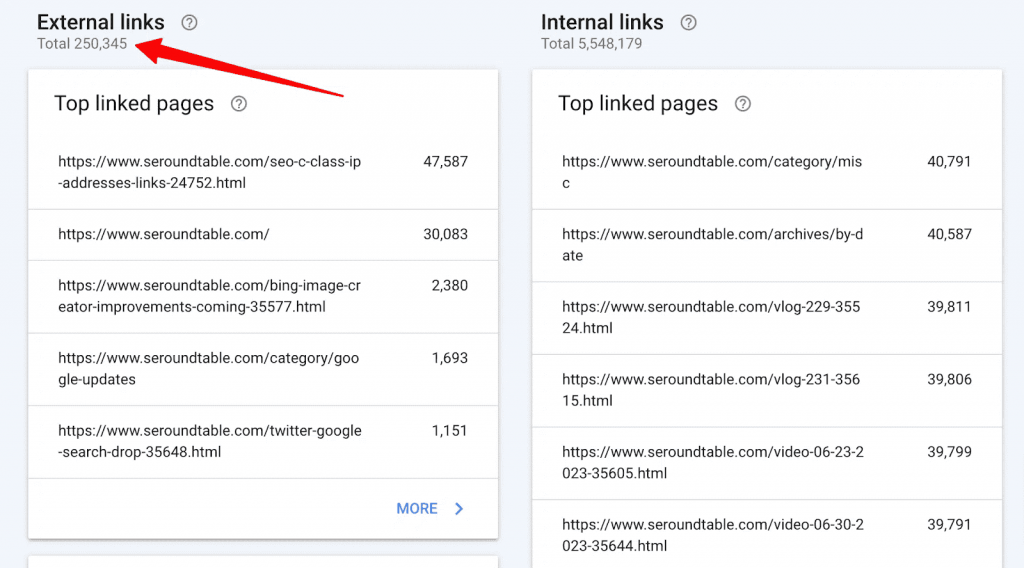
GSC also shows you which websites tend to link to you repeatedly. Plus, you can see which anchor text people use to link to your site.
It’s a very detailed insight that can help you get more backlinks in the long run. For example, if we at Keywords Everywhere see that the most commonly used anchor text to link to our site is “keyword checker,” we can take it as a sign that we should create more content on this query.
The Links Report also shows you internal links. These are the links from pages within your website. Again, you can see the top linked pages.
Alternatively, you can use Keywords Everywhere to check backlinks to not only your site but also your competitors’ sites.
Shopping Report
As an e-commerce store, you’ll have product markup implemented on your website. So, you’ll see an additional report in your GSC, the Shopping Report.
The Shopping Report shows you how well your product markup is doing on Google search results. It includes:
- Product snippets: The report shows you if there are any issues with the product snippets in SERPs.
- Merchant listings: You’ll see issues related to the structured data of free listings on Google.
- Shopping tab listings: The report shows you issues regarding product markup on the Shopping tab.
If you find any ”invalid” items in these reports, the page won’t show as a rich result in SERPs. Review these items to find out what the issue is and fix it.
You can then use the Rich Results Test to check if the problem has been resolved.
How to Use Keywords Everywhere With Google Search Console
Without Keywords Everywhere, when you go to the Google Search Console, and click on the ‘’Performance’’ tab, you’ll see a graph showing you the search trend on your website.
On the top of the chart, you will see four options: total clicks, total impressions, average CTR, and average position.
Click on ‘’Average position.’’
Underneath the graph, you’ll see the average position for different keywords used on your website. Google Search Console shows three metrics for your keywords:
- Clicks: The number of people who have clicked on the pages containing that keyword.
- Impressions: The number of people who have viewed those pages.
- Position: The position of that keyword on Google.
While this is decent data, it doesn’t tell you much about the keyword usage. Without information about the keyword search volume and cost-per-click (CPC), you cannot inform your pay-per-click (PPC) ad campaign or content marketing strategy.
That’s where Keywords Everywhere helps. Let’s learn how.
Step 1: Open Google Search Console
Just as before, open the Google Search Console, but with the Keywords Everywhere extension on this time.
Step 2: Analyze the Table
With the extension on, the table will have a few more columns now.
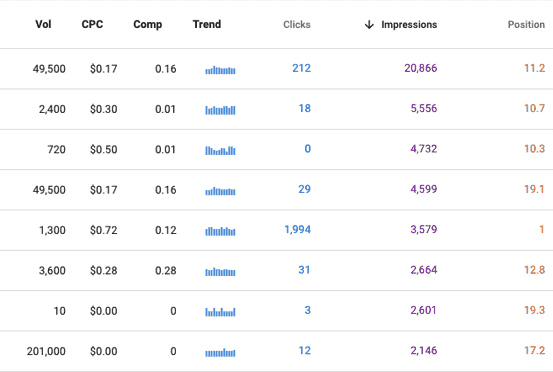
They will show:
- Volume: The search volume for that keyword (number of people who search for it in Google).
- CPC: The cost-per-click for the keyword.
- Comp: The competitiveness of the keyword, with values ranging from 0 to 1. While 0 is the least competitive, 1 is the most.
- Trend: The search trend for the keyword.
Step 3: Arrange Results by Impressions
Since you want to derive useful insights from the table, it’s best to arrange it by impressions. If a query has high impressions, it’s likely doing well, and can be leveraged for content marketing.
To do this, click on the arrangement icon on the right side of the table, and select Position.
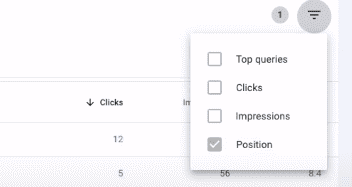
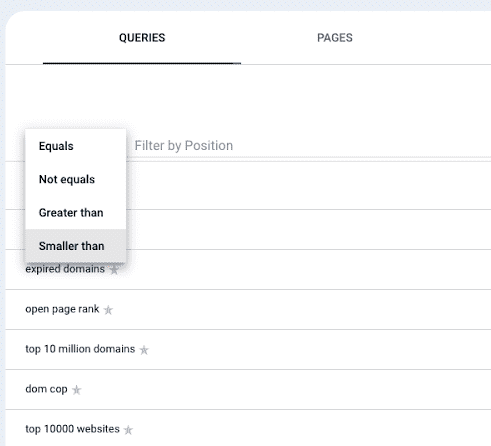
Next, filter the results to only show the keywords that appear on the first and second pages of Google. Since these results already get a lot of traffic, you can focus on them to increase your rank.
In the Filters section, select Smaller than. Then, type ‘’20’’ to only see results from the first two pages.
Step 4: Analyze the Results
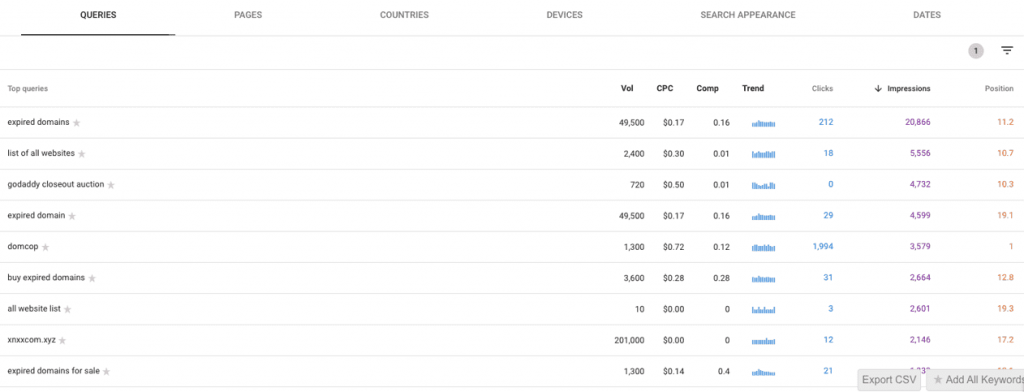
Now, you can see the queries with high impressions that appear on the first two pages. Since the Keywords Everywhere extension is on, you’re not limited to the impressions.
You can also see the number of searches each query is getting and how competitive it is to rank for.
Step 5: Select Keywords for Further Analysis
Suppose you decide you want to work on five of these keywords. Maybe you’re planning to create a content map around them.
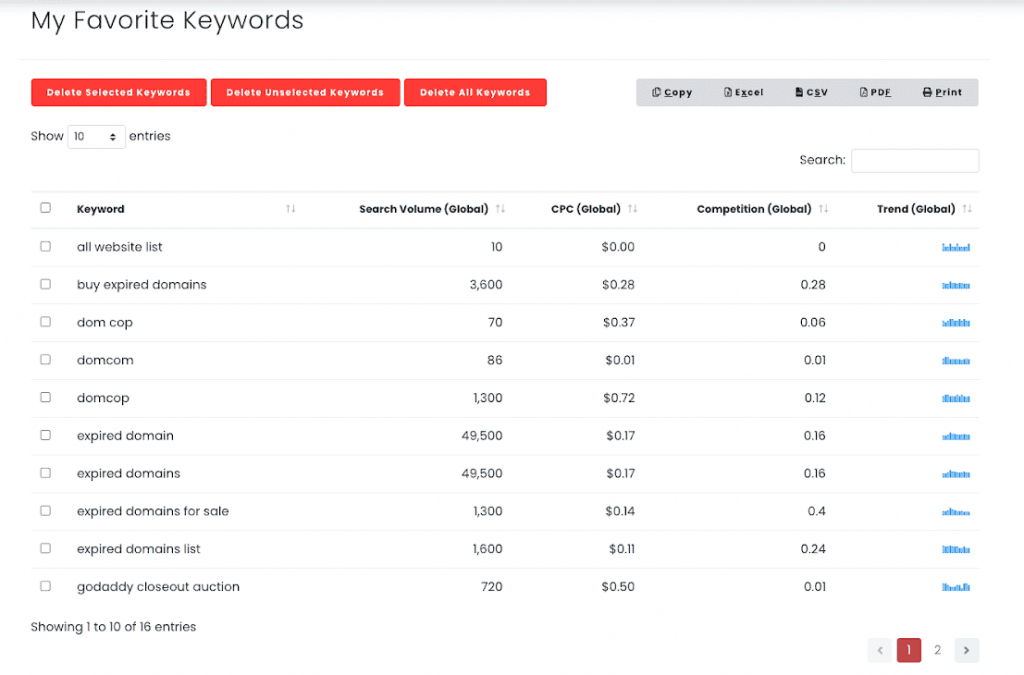
Simply click the star icon next to them to add them to your favorites.

If you want to view your favorite keyword, go to the Keyword Everywhere extension menu, and select ‘’My Favorite Keywords.’’
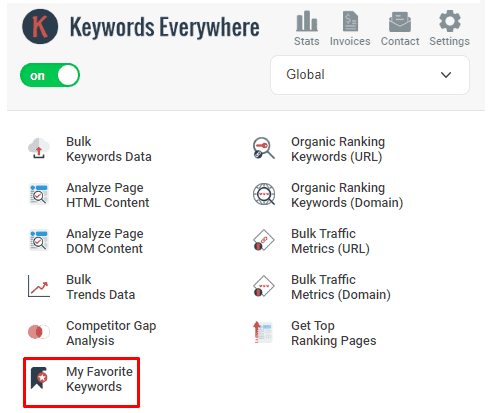
Your selected keywords will open in a new page.
Step 6: Download the Keywords
While you could simply view your keywords along with their data within Keywords Everywhere, it may be helpful to keep a copy you can come back to whenever you want. Keywords Everywhere lets you copy the table into an Excel file.
Or, you can download the table in a CSV for Excel format.
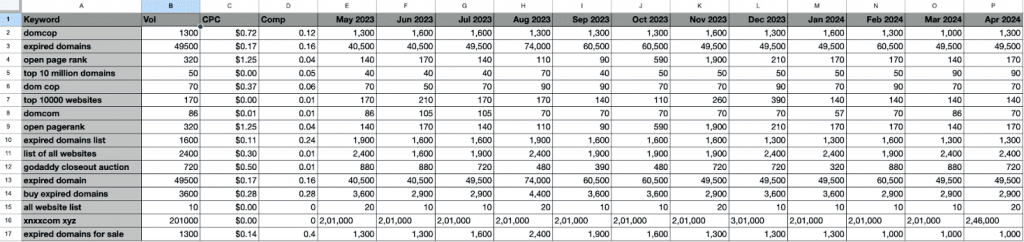
The table shows all columns you saw earlier. Plus, it separates the Trend tab into separate columns for the past few months. So, you can see the search volume for each query during all these months individually.
Why Use Keywords Everywhere in Google Search Console
Keywords Everywhere enhances the capabilities of Google Search Console. It gives you more insights into your data to help you make informed decisions.
Here’s how.
Search Volume Analysis
There’s a difference between the search volume, impressions, and clicks. Just because a query has more impressions doesn’t mean its search volume is high. Similarly, more impressions also do not warrant a high click-through rate.
Understanding this difference is important in your keyword strategy.
Keywords Everywhere helps you analyze search volume data for each query in Google Search Console. You can then see the true popularity of your keywords and make better decisions about which ones to target for SEO.
For example, in our results, ‘’godaddy closeout auction’’ has more impressions than ‘’expired domain.’’ If you were to only look at Google Search Console data, you would assume that the former is a better query to target for a blog on your website.
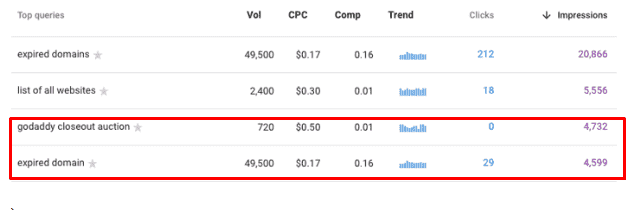
However, Keywords Everywhere shows you that “godaddy closeout auction” only has a search volume of 720, compared to 49,500 of “expired domain.”
So, despite having more impressions, the former query has a significantly lower search volume and may not be worth targeting compared to the latter.
Query Competitiveness Analysis
If you’re a small business or a new website, targeting highly competitive keywords may not be the best strategy. Since there’s already a lot of competition for those keywords, it may be harder for you to rank higher in search results.
Since Keywords Everywhere shows you the competitiveness of each query, you can choose to target keywords with lower competitiveness but still a decent search volume. This way, you have a better chance of ranking higher and getting traffic.
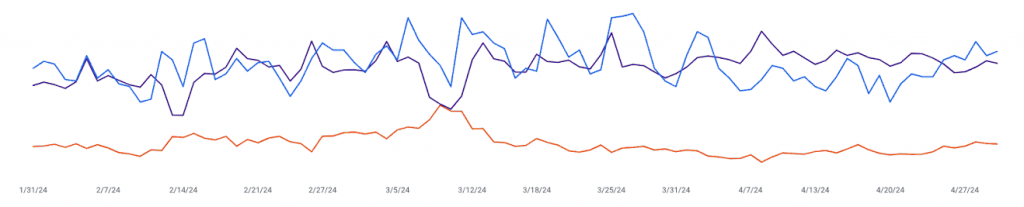
Trend Analysis
Keywords Everywhere also shows you the search trend for each query in the table. You can see which months of the year people are searching for a particular keyword the most.
For example, in our results, you can see that “expired domain” has a consistent search trend throughout the year. So you can create content around it throughout the year.
The same is true for “buy expired domain.”
But if you look at the graph next to “all website list,” you’ll see that it fluctuates. So, if you want to base your content on this keyword, do it during the months that it has the highest search trend.
CPC Analysis
When running CPC campaigns, you want to target keywords that have a low cost per click (CPC) but a high search volume.
Keywords Everywhere displays both metrics, making it easy for you to decide which keywords to include in your campaign.
Conclusion
It’s evident that Google Search Console is your best buddy when it comes to keeping your site search engine-friendly. It’s where you find what’s right and what’s wrong.
Integrate Keywords Everywhere into GSC to make more sense of the data in the Performance tab. While you’re at it, check your GSC reports regularly to ensure your site is in good standing with Google.